This is a follow-up to my previous post regarding scrapping using Selenium and Chromedriver to extact data from the web. When I first started out with Python my code was just a huge block of text. The concept of a class was far and away from my ability to comprehend at the time. I’m sure this can be the case with anyone that starts out learning a programming language. But after some experience and learning how classes work, I decided it was high time to rebuild my scraping project with a Scraper object. You can check out my github public repo for the Scraper class I created which is used in this demo and leverages Selenium Webdriver. Having created this class, I noticed that my code was much cleaner and easier to follow and debug. Let us dive in.
Here we import my Scraper class and the robotparser.
We will again respectfully check the sites robots.txt file to ensure we are being considerate of the sites scrapping policies.
defrobot_check(url_parts):url=''.join([str(p)forpinurl_parts])rp=robotparser.RobotFileParser()rp.set_url(url)rp.read()ifrp.can_fetch("*",url):print("Robots.txt: User Allowed")returnTrueelse:print("Robots.txt: User Disallowed. Please abort.")returnFalse
In this example we’ll be scraping the Intel Corp Income Statement from the NASDAQ website. We’ll call the robots_check function to confirm we are good to go on the scraping side. You will notice here I split the url into 3 parts. From my previous projects it was important to be able to frame urls this way because when you are looping through stock tickers only part of the url will change.
# test ticker symbol @ nasdaq.com
test_ticker="INTC"url_prefix="https://www.nasdaq.com/symbol/"url_suffix="/financials"url_parts=[url_prefix,test_ticker,url_suffix]robot_check(url_parts)
Robots.txt: User Allowed
My Scraper class also allows defining parts of the xpath. The reason for this will be obvious in the next steps.
# xpath of @top left of table @url
# >> //*[@id="financials-iframe-wrap"]/div[1]/table/tbody/tr[1]/td[2]
# xpath of @bottom right of table @url
# >> //*[@id="financials-iframe-wrap"]/div[1]/table/tbody/tr[19]/td[5]
# these are the string parts of the xpath that
# will not change while we iterate
xpath_part1='//*[@id="financials-iframe-wrap"]/div[1]/table/tbody/tr['xpath_part2=']/td['xpath_part3=']'
When you go into the inspector on Chrome you will notice the xpath of the income statement items are effectively a table of rows and columns. Therefore, our xpath_column_key and xpath_row_key are an enumeration of those columns and rows. You can then see why the xpath_parts assignment is perfect for our needs. We create a list of xpath_parts list in a double for loop list comprehension by iterating over our column and row keys.
# init the column and row keys for the example table
xpath_column_key=[iforiinrange(2,6,1)]# create column index 2-5
xpath_row_key=[iforiinrange(1,20,1)]# create row index 1-19
# make an array of xpath_parts that we're going to iterate over
xpath_parts=[[xpath_part1,r,xpath_part2,c,xpath_part3]forcinxpath_column_keyforrinxpath_row_key]
Now that we have the url_parts and our list of xpath_parts we are ready to create our Scraper object. Set the scraper object property to True if you would like to see all the internal debugging statements from the class. Otherwise, leave this as False. getChromeDriverPath will take a path that is user defined or will look for the chromedriver in some default locations. It also checks if you are on Mac or Win. Once the driver is created, set the URL to be scrapped using setURLFromParts then LoadPage.
# create an ariScrape object
scrapeObj=Scraper()scrapeObj.verbose=FalsescrapeObj.getChromeDriverPath()scrapeObj.getChromeDriver()scrapeObj.setURLFromParts(url_parts)scrapeObj.LoadPage()
Chrome should now open in test mode. If you would like the values being extracted to show leave val_verbose set to True. The loop iterates through our xpath_parts list to go through each of the column/row combinations and extract the value. Then we close the webdriver.
# set this to True if you want to see the extracted
# values -- useful when obj.verbose is False
val_verbose=Trueforxpinxpath_parts:scrapeObj.setXPathFromParts(xp)scrapeObj.ExtractFloatAtXPath()ifval_verbose:print(scrapeObj.scrapped_item)scrapeObj.driver.close()
If you have any recommendations to improving the code please feel free to reach out. I’m always seeking to learn new and better ways of coding. I hope you enjoyed reading, and remember:
I recently worked on a Chatbot that would recommend a wine based on document similarity. One of the harder aspects I encountered was developing a nice UI that would serve as the front end for my chatbot. To this end, I set out to learn how to use PyQt5.
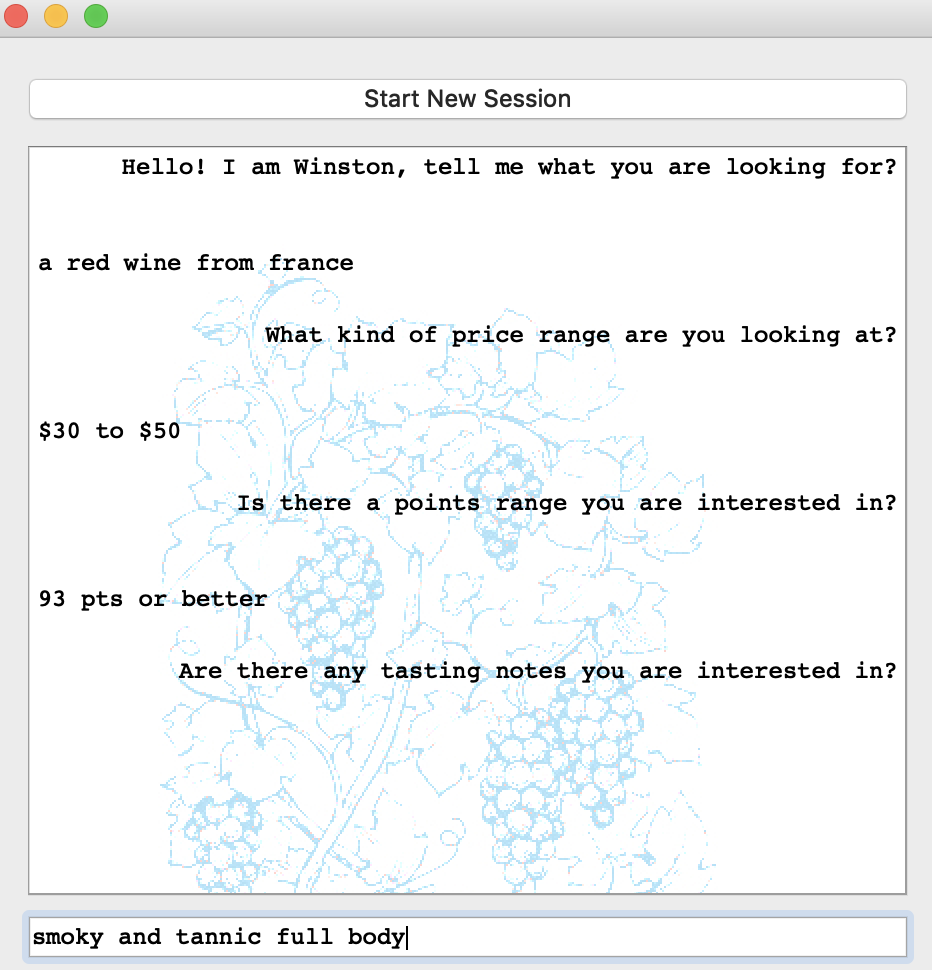
Here is a visual of the final UI in my project. In the code I’ll walk you through how to establish this kind of setup.
Here are the imports for my project. QtWidgets is the main import as this is what creates our app via QApplication, and when we create an Window class object we use QtWidgets.QWidget. The only functionality I use QtCore.Qt for is to switch the alignment of my QTextEdit object from left to right. This gives me the flexibility to give the impression of a back and forth chat dialog by putting the bot text on the right and the user text on the left. QtGui.QFont is used to resize the font of the button object and the user input QLineEdit object.
# Imports for PyQt5 Lib and Functions to be used
fromPyQt5importQtWidgetsfromPyQt5.QtCoreimportQtfromPyQt5.QtGuiimportQFontfromPyQt5.QtWidgetsimportQWidget,QApplication
The following stylings are assigned to variables which I’ll use later on to set the style on my QTextEdit and QLineEdit objects.
As the Doc String for __init__ implies here we define all the objects that will be used to construct our PyQt App. There are various layouts available in PyQt. I chose the QVBoxLayout because it worked best for my project. The important thing to note is that I have a QTextEdit and a QLineEdit object. Why do I have two different types of text containers? QTextEdit will expand depending on the size of my app. QLineEdit as the name implies will stay as a single line and will not grow when I adjust the app height or change the window geometries. You can see how I would want the size of my user input to remain static regardless of how I change app dimesions whereas the Chat dialog box (QTextEdit) can expand as this is OK for the project and what I’m trying to do.
classWindow(QtWidgets.QWidget):def__init__(self):'''
Initilize all the widgets then call the GuiSetup to customize them
'''QtWidgets.QWidget.__init__(self)self.v=Noneself.layout=QtWidgets.QVBoxLayout(self)self.button2=QtWidgets.QPushButton('Start New Session')self.font=QFont()self.font.setPointSize(12)self.chatlog=QtWidgets.QTextEdit()self.userinput=QtWidgets.QLineEdit()self.userinput.returnPressed.connect(self.AddToChatLogUser)self.button2.clicked.connect(self.getBot)self.GuiSetup()
Yes, GuiSetup() gets called in the __init__. I could have just put these lines in there, but I wanted to be explicit that these lines are tweaking the widgets. Recall that we created ‘styles’ to be applied to the widgets prior. Here we apply those parameters with .setStyleSheet(). The self.layout.addWidget calls sequentially add the widgets from top to bottom (vertically) thus now you know why it is called QVBoxLayout because it is a box laid out vertically. What is important to note is that the button and user input widgets do not expand when the window size changes while chatlog (a QTextEdit object) will expand. This is exactly the flavoring we want for our chat box.
defGuiSetup(self):'''
Styling and Layout.
'''self.chatlog.setStyleSheet(setStyleQte)self.userinput.setStyleSheet(setStyletui)self.userinput.setFont(self.font)self.button2.setFont(self.font)self.layout.addWidget(self.button2)self.layout.addWidget(self.chatlog)self.layout.addWidget(self.userinput)
In UpdateCycle the app will set the alignment to right justified via setAlignment(Qt.AlignRight) because we want our bot messages to appear on the right side. In the AddToChatLogUser call, we set the alignment left with Qt.AlignLeft append the user’s input with .append and then explicitly reset the alignment back to right as the next output will be the bot responding to the user. While it’s true that the bot’s response is aligned right before posting, it’s always a good idea to be explicit about my default state which I choose as being right aligned.
defUpdateCycle(self):'''
Retrieves a new bot message and appends to the chat log.
'''bmsg=self.v.getBotMessage()self.chatlog.setAlignment(Qt.AlignRight)[self.chatlog.append(m)forminbmsg]self.userinput.setFocus()
defAddToChatLogUser(self):'''
Takes guest's entry and appends to the chatlog
'''umsg=self.userinput.text()self.chatlog.setAlignment(Qt.AlignLeft)self.chatlog.append(umsg)self.chatlog.setAlignment(Qt.AlignRight)self.userinput.setText("")
Here’s the call to self when I’m opening this code stand-alone. The important thing to note is setGeometry. Setting the third and fourth parameter to 480 I essentially create a box app 480x480 pixels.